Showing posts with label vegan. Show all posts

Sunday, January 21, 2018

Recipe: Sugar free vegan peanut butter fudge

This recipe is one of those happy accidents, I was making sugar free white chocolate and used the wrong sweetener which split the cocoa. I decided to salvage the mess and this is the delicious result full of healthy fats. Cocoa butter is a new ingredient for me in my kitchen arsenal - it keeps high fat low carb desserts stable at room temperature and adds a creaminess without the use of dairy.

Your mileage may vary on low carb sweeteners and glycemic index. If you are keeping low carb be sensible about what works for you and switch out the erythritol for stevia or sucralose. Erythritol is the perfect sugar replacement for me when making confectionary, it has 0 impact on my blood sugar and has a pleasant cool mouth feel, you can even powder it to work like icing sugar.  Remember if you're not keeping low carb you can always use icing sugar or castor (baker's) sugar.


Sugar free vegan peanut butter fudge 


1 cup smooth peanut butter
1/2 cup coconut oil
1/2 cup cocoa butter
1 cup powdered erythritol (Swerve)
1 tspn vanilla essence


Method


  • You can use either the stove or a microwave to make
  • If using a stove add the fats to a pan and turn on low heat or use a double boiler to melt fats gently together

  • If using a microwave place all fats in a glass bowl and microwave on medium for 90 seconds
  • Add the erythritol and stir, heat for another 1-2 mins or until a spoon comes out of the mixture smooth with no visible grains 
  • If using the stove remove the pan from the heat - then add the vanilla. Otherwise you risk the alcohol causing the mixture to boil rapidly.  Stir until the vanilla is evenly distributed


  • Pour into a small tray or fudge tin and then refrigerate for 3 hours
  • Cut with a hot knife, makes approximately 40 pieces
  • 54 Calories, 6g fat, 4g carbs (net < 1g) per piece


Wednesday, January 13, 2016

Recipe: Home made Nutella (Vegan, sugar free, low carb)


Sugar Free Nutella


1 1/2 cups raw hazelnuts
1/2 cup hazelnut oil
1/4 cup coconut oil
3 tbpsn cocoa powder
2 tbpsn liquid stevia


Method


  • Roast the hazelnuts on a piece of foil at 135C (275F) for 15 minutes
  • Remove the tray from the oven and wrap the foil around the nuts, let the nuts sit for 10 minutes wrapped in foil as this will loosen the skin on the roasted nuts
  • Place the roasted kernels on one side of a clean kitchen towel, double the towel over the nuts and rub vigorously to remove the skins
  • Melt the coconut oil in a pan or microwave
  • Put the nuts and hazelnut oil into a blender and pulse until grainy
  • Add the cocoa, coconut oil and stevia
  • Blend on "Liquify" mode until a smooth liquid is formed
  • If liquid stevia is not available dissolve 4 tbspns of stevia powder into the melted coconut oil before using or a grainy texture will result
  • 1/4 cup skim milk powder can be added to get that "just like store bought" taste but compensate by adding an additional tablespoon of oil
  • You can buy hazelnut oil at Safeway or specialty stores but if not available substitute with a light vegetable oil like canola or grapeseed
  • Pour into a jar and refrigerate
  • Try not to eat the whole jar


Thursday, July 30, 2015

Recipe: Hiyashi Chuka (Cold sesame ramen salad)

It's mid Summer here in San Francisco and the heat is turning everyone to cool salad dishes. One of my Seasonal favourites is this cold salad ramen dish. You can top it with just about any leftovers or vegetables you have in the fridge!


Hiyashi Chuka (Cold sesame ramen salad)


Noodle salad:

1 pack of fresh ramen noodles 
1 boiled egg
1/4 cup diced ham or chicken
1/4 cup julienne carrot
1/4 cup julienne cucumber
1/4 cup sweet corn
2 tbspn benishoga pickled red ginger

Dressing:

3 tbspn Japanese rice vinegar 
2 tbspn soy sauce 
2 tbspn sugar 
2 tspn sesame oil

Method

  • Buy good quality fresh wheat ramen noodles at your local Asian supermarket like Sun noodles "instant ramen" style noodles will not do this justice
  • Follow the instructions on the noodle packet - generally boiling in water for 2 mins until al dente is enough
  • Pour your noodles into a strainer and rinse with cold water, this cools the noodles as well as removing the starch.


  • You can prepare the noodles early and cool in the fridge but if you do this you should sprinkle with a half tbspn of sesame oil and then shake the oil through the noodles so they do not stick together. 
  • In a small jar mix the dressing ingredients - vinegar, soy sauce, sugar and sesame oil. If you cannot find rice vinegar white vinegar  will work as a substitute


  • Dice your salad vegetables and cold meat and slice your egg
  • You can use whatever you have in the fridge - cold meat, vegetables and pickles. This combination of egg, meat, cucumber, corn, carrot and Japanese pickled ginger (benishoga) & eggplant (shibazuke) are classic.
  • For a vegetarian / vegan adaptation omit the meat and egg and replace with firm silken tofu and more veges. 
  • Lay the noodles into a shallow bowl and then arrange the salad ingredients on top - using contrasting colours adds to the effect
  • Serve the dressing on the side so that the diners can add at the last minute - this ensures the noodles stay chewy and the salad ingredients crisp and fresh
  • Serve with your favourite sushi and a cold drink!

Thursday, February 5, 2015

Review: Blossom on Columbus, New York City

Too often Vegan restaurants cater only to the down home hippy market, failing to capture the dining dollar of the wealthier ethical diner. Luckily New York City is a bustling food market with a restaurant to cater for every possible variation. Blossom own multiple restaurants in Manhattan, but the venue on Columbus is a lovely formal dining affair within stone's throw of the Central park. The wonderful food and easy distance make this the perfect stop for a post Park or Museum outing. 

By being entirely free of animal products the menu at Blossom also caters easily to the allergen market - gluten free, dairy free, wheat free, nut free and low carb options appear throughout. 


Buffalo Risotto Croquettes $10USD

Spicy risotto is breaded and fried served with vegan "blue cheese"


Heirloom Tomato Salad $14USD

A vegan rendition of a classic Caprese salad with vegan mozzarella and cashew cream. 


Mushroom Ravioli $13USD

Hand made ravioli stuffed with mushroom with a vegan butter sauce.


Southern Style Seitan Sandwich with Sweet Potato Fries $17USD

Seitan is a gluten based meat alternative which is not to my taste but was well enjoyed by my friend. Each of the Sandwiches could be served with a variety of sides 


Vegetable Lasagne Stack $20USD

As a low carb eater I always love to find pasta alternatives. This vegie stack included pasta sauce, vegan mozzarella interleaved between layers of eggplant and zucchini and topped with arugula.  


Fetuccine Alfredo $19USD

Vegan cheese and nut milks are used to prepare this animal free alfredo and served on fettucine with mushrooms, herbs and grape tomatoes.

For a group with very specific food needs this was a perfect choice, while some of the food may seem a little bland or strange to omnivores the chance to have an entire selection of Vegan dishes is rare. The restaurant is well decorated and the customer service immaculate, much recommended. 

Blossom on Columbus


507 Columbus Avenue
New York, NY 10024
United States

Upscale Vegan formal dining


Tuesday, October 15, 2013

Recipe: Low carb "coconut rough" bites

Whether you're looking for 'fat bombs' to add fat calories or whether you just need a sweet treat without breaking a low carb diet this low carb rendition of an antipodean favourite is just delicious.


Low Carb Coconut Rough


1 cup shredded coconut
1/2 cup coconut oil
1 cup Splenda
50g unsweetened baking chocolate
1 tbpsn cocoa
2 - 4 tbpsn cream or coconut cream

Method


  • In a pan melt the coconut oil, this will be soft at room temperature and will require only light simmering
  • Add the Splenda and stir until the sweetener is melted
  • Melt the chocolate in the microwave or a double boiler and add to the oil mixture; then add the cocoa and mix thoroughly
  • Add the shredded coconut and stir while heating on a low temperature
  • Slowly add the cream, for a vegan variation use coconut cream
  • Cook until all the coconut is soaked through with the fudge mixture,
  • When the mixture has reached the consistency of gravy turn the heat off
  • Take a small pan or tupperware container - I used a 10cm * 15cm container
  • Pour the hot fudge mixture into the pan, you may need to tap the container on the bench to get the coconut mixture to create a smooth top
  • Leave to rest until close to room temperature and then refrigerate until solid, preferably overnight
  • If a white layer forms on the outside this is excess coconut oil that has not soaked into the coconut and is perfectly safe to eat
  • Cut into cubes, this recipe should make around 25 pieces
  • A shout out to Guittard 100% Cacao baking chocolate which is delicious and the lowest carb chocolate I can find on the market
  • Calories listed are for the whole batch per piece macros are 62 Calories, 1.6g Carb (1.3g net), 6.7g Fat


Monday, April 9, 2012

Recipe: Fresh Mexican Salsa


Fresh Mexican Salsa

1 red onion
1 ear of corn
1 red capsicum
1 large avocado
1 tomato
1 handful of coriander (cilantro)
1/2 a lemon
1/2 tspn chilli flakes

Method


  • Dice the onion and capsicum and add to a bowl
  • Cut the avocado roughly into cubes
  • Cut the corn kernels from the cob and add to the bowl
  • Dice the tomato and add to the bowl
  • Dice the cilantro and add to the bowl with the chilli and lemon
  • Mix thoroughly until the lemon juice coats the ingredients
  • Serve with corn tortillas and refried beans for a complete vegan meal
  • Great with my vegan chilli
  • Serves 2

Sunday, January 29, 2012

Recipe: Gochujang jjigae

Regular readers will know that have a huge weakness for Korean food, so I thought it was time to start making it at home. Gochujang is the delicious fermented soy and chilli paste that appears in many Korean stews and BBQ dishes. This is my take on a traditional Korean stew, sweet and spicy it's not for the feint hearted but I personally will be making this a regular rotation in home cooked meals from now on.


Gochujang jjigae

1 onion
1 capsicum
1 carrot
2 cloves garlic
1 cup potato or sweet potato
3 tablespoons gochujang
1 cup water
2 tablespoons tomato paste
2 tablespoons brown sugar
1 packet firm silken tofu
oil for frying

Method
  • Prepare your vegetables; Dice the onion, julienne the carrot and capsicum, crush the garlic and cut the potato into cubes. 
  • Heat a pan with a small pool of your favourite vegetable oil. 
  • Stir fry the onions, then the capsicum. When the peppers are soft add the carrot and the garlic and stir fry until the garlic is soft. 
  • Add the gochujang and stir fry to coat the vegetables. Add the water and stir so that the chilli paste forms a sauce. 
  • Add the tomato paste and the sugar, stir until well integrated into the sauce. Taste at this point to balance the flavour, add more sugar or chilli to taste. 
  • Add the potato and cover the stew, boil until the potato is soft. 
  • Dice the tofu and add to the stew, cook for a further two minutes and then take off the heat. 
  • Let the stew rest for 2 minutes and serve with rice and your favourite pickles. Serves 4.
  • Great for vegans and vegetarians but for a meaty twist add diced fish cake in with the potatoes. 

Saturday, February 6, 2010

Review: Inakaya, Midtown, New York City, USA

I had been previously unimpressed with the very Westernised Asian food in the USA - though I admit I am very spoilt by living in Australia and with the sharpened palette of an otaku and sometime sinophile.


While flipping through a local tourist brochure I noticed a review that for Inakaya stated that the "fresh out of Tokyo tastes weren't suited to the American palette." Which meant it was just perfect for me! The Zagat guide wasn't particularly flattering, but their main complaint was that the fresh ingredients caused a higher than normal price tag - but really isn't that often the way with Japanese food?
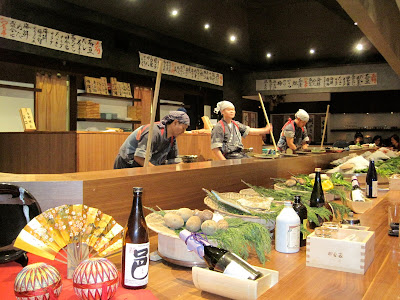


Inakaya is a robatayaki - or grill in the Robata style. This is a more standard grill than the Korean or ishiyaki (stone grill) style I often eat at. Robata is on a wide spaced mesh over an open flame, a more 'rustic' grill often associated with home cooking or street vendors. During cooking the food fanned to get the correct temperature and smokiness in the food; a process well known to players of the Cooking Mama game series!

Most of the restaurant is seated around a large counter where the grill chefs shout orders and deliver the food on large wooden paddles direct to you in a very theatric way. It's all a bit showy and touristy really but a lot of fun and well... after a couple of weeks separation anxiety over Asiana I feel far more at home.
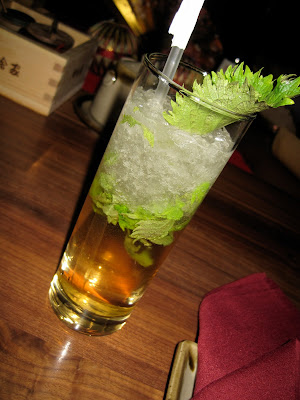


Shiso ume shu mojito $12USD


Well it wouldn't be a review of mine without a hefty dose of alcohol right? And my thirst for ume shu is fairly legendary. This cocktail twist with shiso (a Japanese herb of the basil family) is absolutely delicious; unfortunately we were only able to call in 2 rounds of drinks before their licence ran out and I was not able to get another. On the other hand I don't think this would be a hard drink to mix at home so expect some experimentation in the future.
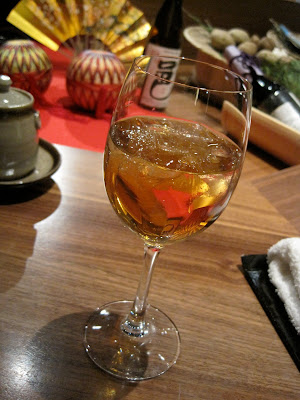


'Premium' ume shu on the rocks $14USD


I am used to being served ume shu in whiskey glasses so the choice of this wine glass is odd to me. Still the aged amber ume shu from Mito-no-karakuen hits the spot, it's smooth and refined and the aging has taken off much of the sweetness of most ume shu.


I am very encouraged by both the staff and clientele as there are many Asians and all the staff seem to be fresh from Japan immigrants with thick Tokyo accents. The American couple next to me make me chuckle though as they've ordered Californian fusion sushi only and look very perplexed at the list of dishes I rattle off quickly and eagerly and then even more perplexed as each arrives.


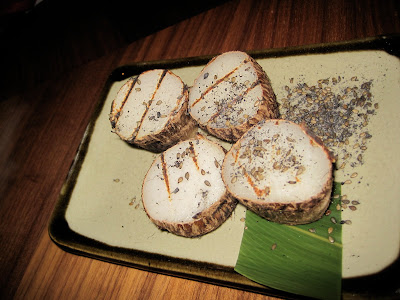
Taro with sea salt and sesame $6USD

Fresh grilled taro is sticky and heavy and not to everyone's tastes but I love it, especially hot grilled with hefty salt like this. It could have done with a little oil but it's rich and sweet and recogniseable vegetable with no fat - which is a real treat in the US.


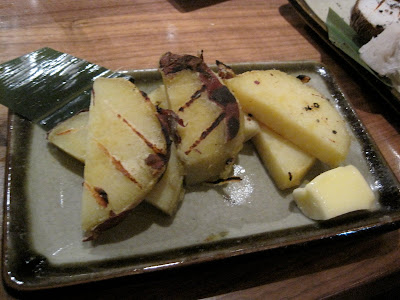
Sweet potato with butter $6USD

I don't recognise the type of yam being used here so please let me know if you do. It's lighter than the Australian Gold sweet potatoes (which are in turn very similar to the American yams used in traditional cooking). Hot and buttery this is pure simple comfort food, the type I love. This reminds me of a purple sweet potato ice cream that I ate in Kyoto once, if anyone knows the type that is used there.


Asparagus $6USD

Served with a sprinkling of salt and a wedge of lemon this is another simple, fresh dish that draws out the fine produce being used at this restaurant. Grilling asparagus is very unusual to me but the fresh crunch is heaven to my system.


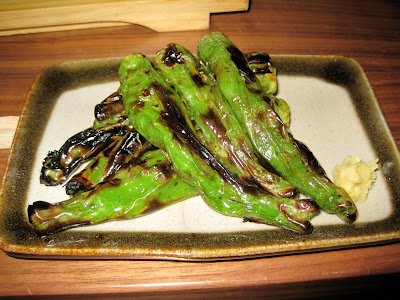
Shishito Peppers $7USD

These long thin Japanese peppers aren't particularly spicey and not particurly of my palette; I guess I am mostly disappointed that the grilling hasn't pulled out a sweetness as you get with many peppers. I decide I am being particular however as my dining companion cleans the whole plate.
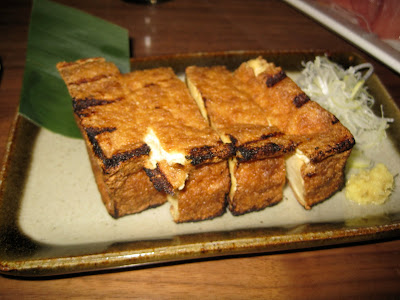


Atsuage $7USD

Once upon a time atsuage was quite difficult to find. As Japanese food has become more palatable to gaijin, especially in Australia where it has lost it's "exotic" edge, atsuage has taken a more prominent place on Japanese menus. Atsuage is marinated and fried tofu slices, which in this case have then been grilled. When sliced thinner and fried at high temperatures you are left with aburaage - the fried tofu 'pockets' that are then simmered with mirin, soy and sugar to produce the coverings for inarizushi.

As a tofu devotee atsuage is one of my favourite foods, the quality of the tofu here is excellent and I would suspect made on site or of a very high quality local supplier. Despite the marinade and the cooking process the internal bean curd is still creamy and thick. The entire dish is set off by the fresh sweet grated ginger served with it.
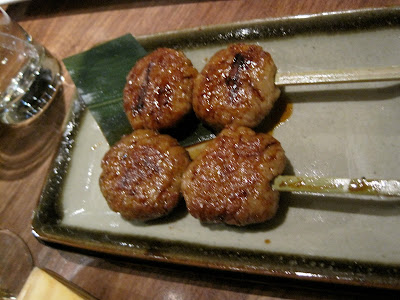


Tsukune $8USD

After my introduction to them in Japan I'm a little obsessed with tsukune and seek them out whenever I'm in Asian grill restaurants. The simple chicken meat balls are always a delicious snack with drinks and here they are basted in a sweet teriyaki style sauce that lingers slightly with a satisfying smile. There's a definite umame taste going on here so either they've used a mushroom concentrate in the basting sauce or there's MSG being added here.
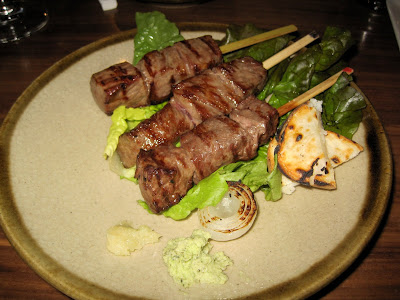


Beef trio $45USD

Now this dish isn't much to look at, 3 skewers of grilled beef, but this will remain one of my most memorable meals for years to come. Much like the progressive nihonshu tasting at Ninja, this is a progressive beef tasting. Each meat is basted using the same spices and grilled to a moist medium temperature, the difference (and it is a key difference) is the quality of the beef.

The first beef is an American Black Angus; now, when you pay good prices for meat in America it's okay quality, nothing to write home about but nothing to complain about either. This is definitely high quality for America but when you've been raised on Aussie beef this is just mediocre. The second beef is an American Wagyu (that they arrogantly call US Kobe), wagyu of course is beef bred between Japanese Kobe beef cattle and Angus cattle, because of the quality of the US Angus cattle I find every encounter with wagyu in the US a little dissatisfying. Nonetheless compared to the pure Angus it is tender, sweet and juicy.

The third beef is a Japanese imported Wagyu and is pure heaven; I suspect it has a higher marbling content than its US counterpart (say Marbling 5+ for the US to 7+ for the JP). It melts on the toungue, the taste is purer and I suspect the animal happier. There is no better illustration for the variable quality of the meat and the influence that Japanese farming techniques have had on beef production; try this at home.


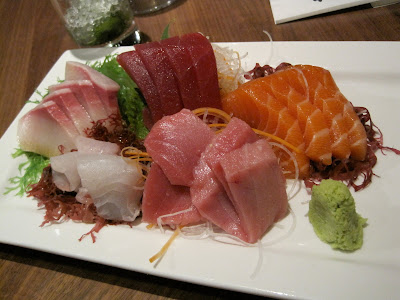
5 Sashimi plate $38USD

Of course it's very unusual to have Sashimi at the end of the meal, traditionally it is the second course in Japanese food, however we kept being presented with hot grilled food by excited Japanese chefs and so it got put to the side a little. Here we are given fresh as fresh yellowtail, salmon, fluke, akami tuna (standard tuna from the top of the fish) and chutoro tuna (medium fatty tuna from the belly).

Most Australians are over excited by salmon sashimi and tend to leap on this first, I am not this person and have always proferred the strong meatiness of tuna. Thankfully the Japanese feel the same way I do and high grades of tuna are prized above most other foods in Japan. There is a special on Otoro high fat tuna imported direct from Tsukiji market in Tokyo but we've already splurged on the beef and $25USD for a small serve of Otoro seems steep to me.

I let my companion eat all the salmon and he's happy enough as he isn't hugely keen on the tuna, later he realises his mistake! The chutoro was such amazing melt in your mouth quality that the taste lingered for hours in a satisfying and meaty way that left us commenting for the rest of the evening; I am incredibly glad that we have left this dish till last.

All in all we leave extremely satisfied. The meal is not cheap but the quality makes up for it and we're more than happy to pay for a good quality Japanese meal in a sea of tourist meals in midtown. It's exactly what we need and actually makes us look forward to going home to Australia where excellent Japanese food can be had as easily as walking out the door.

I am very interested to know how they get such good quality fish into New York, there can't be a good source of Tuna for quite some travelling time and yet the fish is fresh and lacks any of the tell tale textures of having been frozen. The original restaurant is in Roppongi, not really known for its tradition, and I guess this accounts for the slightly touristy service and its Midtown NYC location. Nonetheless I try not to think about it and let the taste of the tuna linger on.

It may not be a restaurant I'd travel out of my way for while elsewhere in the US, but it was definitely good enough quality to take a stop at if you're in New York itself particularly if the thought of fried food or cheese makes you turn green. Good quality, good service, excellent produce values so common to real Japanese restaurants and so lacking in many US restaurants shines on at Inakaya and gives us a breath of fresh air.
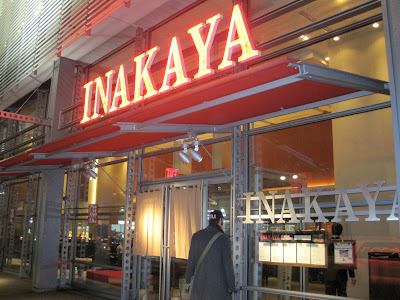
Inakaya NYC


http://www.inakayany.com
New York Times Bldg
Ground Floor
231 West 40th St
New York, NY 10018

Traditional Japanese grill
Bookings advised
Fully licenced
Many vegetarian and vegan options available

Monday, September 14, 2009

Almond Pudding

Sometimes when it comes to specialty foods like those bought in Asian supermarkets knowing which brand to buy is half the battle. There are any number of products I use regularly from ethnic stores that others are interested in and so this is the first of what I hope will be many such posts.


This isn't so much a recipe; this pudding requires the addition of hot water only and being set in the fridge overnight rather like a commercial jelly mix. I use these non stick metal pudding moulds from Wiltshire which run for about $5 each at the supermarket. Each mold uses 2 "serves" of a packet of pudding and so 1 packet will make 3 molds; more than this is overkill unless you're having a dinner party. A set of 6 molds will do most kitchens more than well.


Fairsen Pudding mixes are excellent quality and run for about $2.30 at Miracle Supermarkets in Sydney. The mix is easy to use, has English instructions on the side and comes in a variety of flavours (though I will generally beeline straight for the almond every time). It is a Taiwanese brand rather than Thai like many of the 'ready made' products available, so the style is much like that from Chinese restaurants. Most importantly all the ingredients are recogniseable natural products which is more than can be said for many of the alternatives on the market.

This pudding mix contains Agar and not gelatin and is Vegetarian friendly however it does contain Milk powder and is not Vegan friendly. I would declare this product safe for the lactose intolerant though, as an extreme intolerant case I can eat a single serve with no ill effects; those who are dairy allergic should avoid. For my pick of the Vegan almond puddings I suggest you try TLY Joyce Almond Tofu Dessert which is available fresh in most Asian supermarkets and some city Coles stores.

Traditionally this dessert is served with mixed boiled fruit and inexplicably in most restaurants it has one lone perfectly preserved Maraschino cherry sitting on top with stem intact. Not for me today though, so here's me putting my little Western spin on a Chinese classic.


Almond Pudding with Maple Syrup and Stewed Spiced Apple

So there we have it, a little slice of heaven made at home with very little effort, try it yourself sometime!

Tuesday, June 9, 2009

Recipe: Antipasto Cous Cous

This is a lunchtime special that I've been making a lot of recently, what with all the eating out I thought a recipe would be a good interlude. It's excellent with grilled meat for dinner or on its own for lunch. It's so quick and easy that it can even be made in the morning before work, it also freezes very well and can be made several days in advance.


Antipasto Cous Cous

2 cups dry cous cous
2 cups water
1/3 cup of lemon juice
2 tablespoons butter
1 tspn salt or stock powder
1/2 cup chopped black olives
10 semi dried tomatoes
1/4 cup marinated artichoke hearts
1/4 cup roasted capsicum strips

Method


  • If you are using fresh lemons juice the lemons before you put the pot on to heat and set the juice aside.

  • Put a large stock pot on very low heat. Boil the kettle, when the kettle is boiled add the cous cous to the pot.

  • Mix the salt/stock and 2 cups of the boiled water and add immediately to the pot. If possible put the lid on the pot.

  • While the cous cous is resting to soak up the water dice your antipasto ingredients into strips.

  • Take the lid off the pot and stir vigorously with a large spoon, put the butter in the pot and place the lid back on.

  • Measure out the lemon juice while you wait for the butter to melt slightly.

  • With a fork vigorously stir the cous cous again, this will easily melt the butter throughout the cous cous and will fluff it for good texture due to the tines of the fork.

  • Turn the heat *off* it will no longer be required.

  • Add the lemon juice and stir again, you should now have slightly oiled and fluffy cous cous with a slight lemon tang.

  • To the cous cous mix add your cut up olives, capsicum, artichokes and dried tomatoes. Stir well to distribute evenly.

  • Leave to cool slightly before placing into tupperware containers or serve immediately with your favourite side.

  • This is a very hearty serve, enough for 4 servings of lunch or 1 large dinner and 2 lunches.

  • Use soy or olive margarine for a vegan version.

Tuesday, April 21, 2009

Recipe: Thai Vegan Curry Soup

Those who know my penchant for spicey food can't be surprised that I would manage to come up with a curry soup but this is sweet and tangy with orange vegetables and not overpowering. It's perfectly warming in winter and the Thai spices are great for a cold . This has the the added bonus of being Vegan and still quite special.


Thai Vegan Curry Soup

1 large brown onion
1 large carrot
1 large sweet potato
1/2 butternut pumpkin
400ml can of coconut milk/cream
3 tablespoons green curry paste
1 sprig coriander
1 spring lemon grass
2 tablespoons vegetable (Olive) oil

Method


  • Heat the vegetable oil in a good soup pan, add the onions and fry slowly while preparing other vegetables. First peel and dice the carrot and add to the onion, stirring occasionally.

  • Cooking vegetables at the right speed is usually about density - hard vegetables take longer to cook.


  • Then peel and dice the sweet potato and add to the existing vegetables, by now the carrot should be looking reasonably softened. Dice the pumpkin into large pieces as pumpkin disintegrates quickly.

  • Add a little water and the green curry paste and stir until all the vegetables are coated. Be very careful when choosing a Green Curry Paste as many of them contain fish sauce or shrimp paste Lee Kum Kee which you can buy in all Asian supermarkets and some larger Western supermarkets is animal product free. Otherwise you can make your own paste to this recipe - Galangal and lemon grass are key, do not substitute these spices as the taste is unique.


  • Now add the coconut cream and enough hot water to cover the vegetables; should be at least 2 more cans worth of water. Allow to boil until the vegetables are soft and the pumpkin begins to misshape when you poke it with utensils.


  • Take the soup off the heat and add the minced coriander and lemon grass; if you do not have easy access to fresh herbs many good quality varieties are available in jars in the Asian section of supermarkets.

  • With a stab mixer blend the soup until smooth, the sweet potato and coconut should lend this a creamy consistency once mixed.


  • This is great on its own or with toast, or for a crunchy topping try a small amount of bamboo shoots, fresh lemon grass or strips of capsicum.


Tuesday, March 31, 2009

Recipe: Leek and Potato Soup

I have a cold and it's rainy and miserable so here's my tried and true leek and potato soup recipe.


Leek and Potato Soup

2 leeks
5 large potatoes
1/2 head of cauliflower
50g of butter/margarine
1 clove of garlic
2 cups of vegetable stock
Water
Sour Cream
Smoked Paprika to dust

Method


  • Melt the butter in a large soup pan and leave on low heat. If serving to lactose intolerant guests be sure to use a dairy free margarine.

  • Cut the leeks into small rings, about 1/2 cm in height. Add to the pan with the garlic crushed and fry until the leeks are soft.

  • Peel and cube the potatoes into 1 cm cubes and add to the pot, stir fry with the leeks until the cubes are warm.

  • Cut up the cauliflower into inch cube pieces, be sure to include the stem as well as the florets and add to the pot.

  • Cover the vegetables in the stock and top up with water so that the califlower floats above the potatoes, turn to Medium - High heat.

  • Bring to the boil and then return to Medium heat, leave simmering until the potatoes and cauliflower are soft and lose structural integrity.

  • Take the soup pot off the heat and use a "stick" blender to puree the vegetables. The soup should be as thick as custard, if you have added too much water return the soup to simmering heat and boil off some of the liquid.

  • Serve the soup into bowls, add a dollop of sour cream to those who eat it and sprinkle heftily with smoked paprika. Best eaten with crusty white bread.

  • If you are not keen on cauliflower replace with another 2-3 potatoes, to bulk out the recipe add 1-2 onions and fry with the leeks.

  • To make this recipe vegan/non dairy replace the butter with soy based margarine and omit the sour cream for serving, the soup is strong enough on its own to stand without it.


Monday, March 30, 2009

Recipe: Vegan Chilli

This recipe is a repost of one of our sharehouse favourites; it's full of vegies that the kids will eat and perfect for any vegetarian or vegan visitors. For the more standard eaters add some cheese and sour cream and you're set.


Vegan Chilli

1 large brown onion
2 cans kidney beans (or 1 large bowl of kidney beans soaked in water over night and then par boiled in salt)
1.5 cups sweet corn
1 large capsicum
1 large can of diced tinned tomatoes
1 tablespoon chilli flakes
1 tablespoon chilli powder
2 teaspoons paprika
1 teaspoon cumin
1/2 teaspon oregano
1/2 teaspon marjoram
Olive (or other vegetable) oil for frying

Method


  • Dice the onions and fry in a small amount of salt with a fair quantity of oil - make a pool about the size of the palm of your hand in the pan. Add the chilli flakes to the onion, and garlic if desired.

  • Add the beans with a little of the juice, more of it adds a slightly thicker consistency to the chilli from the bean proteins. The secret to really good thick chilli is to take a potato masher at this point and mash about half of the beans once they are hot from frying. This allows you to 'refry' the insides and releases much more of the protein into the sauce

  • Dice the capsicum and fry with the beans and onion, once this is soft add all the spices and fry into the vegetable mixture, add more oil if required. Once the vegetables have fried with the spices for about 2 minutes then add the tomatoes with a cup or two of water. Remember if you're feeling lazy you can add a pack of taco or chilli con carne seasoning rather than individual spices; be sure to check for animal stock powders though and remember that these spice packs usually contain bean flour or corn starch and so may require a little more liquid or oil to counteract.

  • Once at boiling point add the sweet corn and turn the temperature down to reduce the sauce some what. If you have the time over the course of a day, adding more water and then reducing multiple times makes a softer thicker chilli as the beans and corn are softened.

  • You can serve this with just corn chips or rice cooked with chilli; however my favourite is to serve it in white flour tortillas with shredded lettuce, guacamole and tomato. Tortillas and plain salted Corn Chips should always be Vegan friendly but check for animal sourced preservatives on the packaging. Rosita's Mexican Meal Range are available at all Woolworth's and are not only Vegan friendly but damn good quality and Australian owned and made.

  • For those intent on animal products... This recipe works quite well with meat, just replace half the beans with some lean beef mince and reduce the amount of oil used. Service with sour cream and cheese for the dairy tolerant and thin of waist.

Monday, January 19, 2009

Recipe: Vegan Tapioca 'Brain' Pudding

Some time ago I was devising a vegan/gluten-free/dairy free dessert recipe and came out with this cherry tapioca pudding. Unfortunately comments on the colour and texture were less than flattering, but this has doubled to become a wonderful Halloween treat; add one zombie-licious brain mould and voila! The most gruesome vegan food you'll ever eat.

Thanks to for the picture.


Cherry Tapioca Pudding

1/2 cup sago or tapioca pearls
2 cups water
400g canned pitted cherries
400g can of coconut milk
4 tablespoons sugar/sugar replacement

Method


  • Soak the sago in 1 cup of the water in a large mixing bowl for an hour, the sago should expand and become soft.

  • Put the soaked sago on medium heat with the coconut milk, make sure to use a large saucepan as the tapioca pearls will still expand considerably

  • When boiled take to low heat and add the cherries

  • Stir occasionally and keep on low heat for 10 minutes, the sago should expand and take on all the liquid

  • Add the second cup of water and the sugar and stir through tapioca.

  • Heat for another 5 minutes or until at least 90% the tapioca pearls are entirely transparent, a small number with a white centre is okay, these will take on more liquid while setting.

  • Let rest for 10 minutes and spoon into rammikins or moulds, this recipe should be enough to make 4-6 servings.

  • If desired line the mould with a thin layer of set Agar based cherry jelly before adding the sago mix.

  • Put into a fridge and set over night.

  • To serve place the moulds in a warm water bath for 2 minutes and turn out onto a plate.

  • If desired use other tinned fruit in syrup for variation or use coconut cream for a richer result.

Friday, January 2, 2009

Recipe: Onion Gravy


Ingredients:
2 brown onions
oil for frying
1 clove garlic
1 cup vegetable stock
1 cup "meat" stock (works best with beef)
3 tablespoons flour
1 tablespoon balsamic vinegar
2 tablespoons red wine

On the use of stock:


  • For the stock you may use all vegetable stock for vegetarians, this works just as well as a vegan gravy.

  • I use a lot of home made and frozen stock boiled from bones and roast leftovers however you may use prepared stock powder or liquid.

  • If you are going to use powdered stock be sure to taste the gravy as you mix in the stock. You may wish to replace some of the stock with water owing to the salt content of commercial stock powder.

  • When using primarily vegetable stock or home made 'natural' stock this gravy lacks the distinct brown colour many people associate with commercial gravy powder. If you have a fussy child or eater at your table it is advised that you add a beef stock cube to your gravy or replace some of the stock with a small quantity of soy, Worcestershire or other source of brown colouring.


Method:


  • Preheat the oil in a non stick pan at medium heat.

  • Dice the onions and fry in the oil, when clear add the garlic crushed or diced finely. Fry until the onions are slightly brown.

  • Measure out your stock and have it easily to hand.

  • Reduce the pan to low heat. and add the flour one spoon full at a time, stirring quickly. The onions, oil and flour should form a moist ball in the pan.

  • Add the stock about 1 tablespoon at a time, stirring all the while. It is generally best to alternate between the meat and the vegetable stock so that you may alter for taste.

  • Once the gravy is a thick sauce like consistency add the balsamic and the red wine and simmer for a further 5 minutes.

  • Serve over sausages, steak or with vegetarian roast, works very well with cracked black pepper.