Showing posts with label gluten free. Show all posts

Monday, February 19, 2018

Recipe: Low carb (sugar / gluten free) baked cheesecake

This is a recipe inspired by the classic Junior's Cheesecake recipe but tooled slightly to add a low carb base and remove the sugar. The result is a creamy and delicious cake with a lot less guilt. Remember to be sensible though this is not a low calorie recipe - don't fool yourself that you can have a bigger slice even if you want to!


Low Carb Baked Cheesecake 


Base

1/2 cup almonds
1/4 cup walnuts
1/2 tspn pumpkin pie spice
20g butter

Batter

4 packages of cream cheese (8 oz or 225g each)
1.5 cups Splenda granulated sweetener (or equivalent low carb sweetener)
1/4 cup cornstarch
1 tbspn pure vanilla extract
2 extra large eggs
3/4 cup heavy whipping cream


Method


  • To prepare the base place the nuts, butter and spice in a food processor 


  • Pulse until the nuts have crumbled and the butter is distributed evenly, you should be left with a moist dough like consistency


  • Line a 7 or 9 inch spring form pan with baking paper, making sure to leave enough slack to fill the bottom of the pan
  • Even out the base using the back of a spoon to leave an even thin layer of the nut mixture


  • Preheat the oven to 165C (325F) and set the pan asside while you prepare the batter
  • Room temperature cream cheese works best for this recipe - cold cheese will be harder to beat
  • Where possible use a paddle attachment rather than a whisk, this helps with the creamy texture 
  • You can use other sweeteners if you prefer (like Stevia or Erythritol) but the baking Splenda holds the best taste after baking. 
  • Make sure to use the "spoon for spoon" granulated Splenda powder that measures like sugar and not coffee packets of Splenda which is highly concentrated
  • Add 1 pack of the cream cheese, 1/2 cup of Splenda and the corn flour to the mixer and beat until well combined


  • Scrape down the sides and then add 1 more pack of cream cheese and 1/2 cup Splenda, then repeat with the remaining cheese and sweetener
  • Add the vanilla essence and one egg, beat on slow until well combined then add the remaining egg
  • Turn off the machine and add the cream, again beating on slow to avoid liquid splashes

  • Once all ingredients are in the bowl turn the mixer to medium and beat for 2-3 minutes or until the mixture takes on a billowy texture
  • Pour the batter into your tin with the nut base then jiggle the tin slightly to flatten the top, be careful not to tap the tin too hard or you will lose air from the cake
  • This cake requires a water bath - place the tin into a roasting tray or casserole dish and fill with water to about halfway up the spring form tin

  • Bake until the top is golden and no longer wobbles, about 1 hour. For best results turn the cake half way through
  • Once baked remove the roasting tray from the oven and then remove the tin from the water. Set asside to cool leaving it in the tin for 2 hours
  • After 2 hours cover the cake and refrigerate until cold or preferably the next day. Release and remove the springform pan after cooling, if possible just before serving
  • Serves 8 people - on its own or topped with cream or nuts for a low carb option or any other cheesecake topping if you prefer

Wednesday, August 17, 2016

Recipe: Okonomiyaki

It looks super fancy but okonomiyaki is a simple dish that's easy to make during the week. Okonomiyaki is "grilled as you like it" so get creative with the vegetables and toppings - use up leftovers and smother in delicious sauces for a sure fire winner.


Okonomiyaki


1/2 a head of cabbage
3 eggs
1 cup soy milk
1/2 cup water
2 cups flour
1 serve of hon dashi (bonito stock)
2 tbspn sesame
2 tbspn soy sauce

Toppings:

1/2 cup diced spring onion (scallion)
1 bottle of squeezable mayonnaise
1 bottle okonomi or tonkatsu sauce
1 tbspn sesame seeds

Method


Dice the cabbage and scallions and set asside. If you are using leftover vegetables or meat in your dish now is the time to mix them in


Mix the flour and bonito stock together in a bowl. For a gluten free alternative use rice flour.


Bonito stock can be bought in powdered sachets at any good Asian supermarket. For a vegetarian alternative use Vegeta or add vegetable stock in place of water to the egg mixture.


Crack the liquid ingredients into a bown or jug - egg, soy milk, sesame oil, soy sauce and water. 


If using liquid stock add to this step. Whisk until well combined.


Mix the flour, vegetables and egg mixture into a loosely formed batter. You can add more water at this stage if you want a more pancake like consistency.


Oil a small non stick pan and fill 3/4 inch with vegetable batter. Fry until the vegetables are browned half way up the sides. 


Use a plate to flip the pancake and fry until golden brown.


Prepare your pancake for dressing. 


Drizzle okonomi or tonkatsu sauce on top of the pancake. 


Tonkatsu sauce is very similar to okonomi sauce but usually intended for fried pork, it is easier to find in the US. 


Drizzle mayonnaise in the same direction as the okonomi sauce using a small squeeze nozzle


Turn the plate and drag a chopstick across the sauces for a decorative touch.


Sprinkle with scallions


Top with sesame seeds and serve on its own or with your favourite grilled meat and Japanese croquettes.

Wednesday, January 13, 2016

Recipe: Home made Nutella (Vegan, sugar free, low carb)


Sugar Free Nutella


1 1/2 cups raw hazelnuts
1/2 cup hazelnut oil
1/4 cup coconut oil
3 tbpsn cocoa powder
2 tbpsn liquid stevia


Method


  • Roast the hazelnuts on a piece of foil at 135C (275F) for 15 minutes
  • Remove the tray from the oven and wrap the foil around the nuts, let the nuts sit for 10 minutes wrapped in foil as this will loosen the skin on the roasted nuts
  • Place the roasted kernels on one side of a clean kitchen towel, double the towel over the nuts and rub vigorously to remove the skins
  • Melt the coconut oil in a pan or microwave
  • Put the nuts and hazelnut oil into a blender and pulse until grainy
  • Add the cocoa, coconut oil and stevia
  • Blend on "Liquify" mode until a smooth liquid is formed
  • If liquid stevia is not available dissolve 4 tbspns of stevia powder into the melted coconut oil before using or a grainy texture will result
  • 1/4 cup skim milk powder can be added to get that "just like store bought" taste but compensate by adding an additional tablespoon of oil
  • You can buy hazelnut oil at Safeway or specialty stores but if not available substitute with a light vegetable oil like canola or grapeseed
  • Pour into a jar and refrigerate
  • Try not to eat the whole jar


Monday, January 11, 2016

Recipe: Coffee Jelly (low carb, gluten free, dairy free)

Coffee jelly is a common dessert in Asia and it's very easy to prepare, low in calories and free from any artificial flavours or additives.


Coffee Jelly


4 cups of coffee
2 packets unflavoured gelatin
3 tbspns sugar or stevia


Method

  • Prepare coffee as usual - brewed or French press coffee works best
  • Pour 1/2 cup of the brewed coffee into a bowl and sprinkle with the gelatin 
  • Wait for the gelatin to bloom into the liquid
  • Pour the remaining coffee and sweetener into a saucepan
  • Add the bloomed gelatin and coffee 
  • Heat and stir until the sweetener and gelatin have dissolved
  • Using a sieve to catch any undissolved gelatin or loose coffee grinds pour into moulds or cups

  • Cool overnight or until set in the refrigerator
  • To remove from a mould set the mould in a bowl of warm water then turn onto a serving plate
  • For a vegan alternative use agar agar in place of gelatin
  • If desired serve with unsweetened cream or sweetened condensed milk
  • Makes 4 1 cup servings (Macros with stevia: 20 calories, 1g carb, 0g fat, 4g protein)


Sunday, November 8, 2015

Recipe: Chimichurri beef with roasted red peppers (Low carb, gluten & dairy free)

Sometimes cooking for my team at work can be hard since we all have so many dietary restrictions. This was a great answer for the low carb and gluten free diners. Chimichurri adds a freshness that lifts even fatty beef and it pairs wonderfully with the sweet roasted peppers. I've prepared this dish with a beef roast but it works just as well with grilled flank steak or rib eye - use the meat that fits your budget. 


Chimichurri beef with roasted red peppers 

1 bunch flat leaf parsley
6 - 8 cloves garlic
3⁄4 cup extra virgin olive oil
1⁄4 cup red wine vinegar
1/2 lemon
1 tablespoon diced red onion
salt and pepper to taste

300g beef per person

Method

  • Cut the cheeks off your peppers and deseed
  • Place on a foil covered baking tray and grill at 260C (500F) fairly close to the heat on a high shelf
  • The skin of the peppers will begin to blacken and bubble - this is intended and we want as much of the skin as possible to blacken
  • 8 - 12 minutes should be enough depending on the heat and freshness of your peppers
  • For best effect use 2 - 3 colours of peppers for contrast


  • As soon as the peppers are out of the oven wrap them in the foil you used to bake on. 
  • Wrapping the peppers in foil contains the moisture and steam and this will make removing the skin easy


  • Leave for 10 minutes then unwrap and scrape off the blackened skin with a fork. Your nude pepper cheeks should look a little something like this


  • Cut into small strips and leave to cool 


  • Set your oven to 180C (350F) if you are roasting beef
  • For steak wait until the peppers and sauce are made before grilling


  • For roast beef turn into a baking tray fat side up, liberally coat in salt and pepper and score the fat, roast while we prepare the sauce Bake at 180C (350F) for around an hour


  • To prepare the chimichurri you may want to use an electric chopper since you will need to finely dice all the ingredients. Make sure to only use the pulse setting to avoid liquifying your herbs
  • Feel free to do this by hand using a chef's knife if you have good knife skills or you prefer a courser sauce
  • Dice the onion and add to a bowl
  • Finely chop the garlic and parsley together
  • Add the vinegar, oil and citrus juice then stir
  • Taste and then season with salt and pepper
  • If you wish to soften the sharpness of the dish you may add more oil and a small amount of Stevia or brown sugar (1/4 teaspoon should be enough)
  • Slice the beef into slices then layer with chimichurri sauce and roasted peppers
  • Serve with a fresh green salad


Saturday, October 3, 2015

Recipe: Sugar Free Marzipan (Easy, Low Carb & Gluten Free)

Marzipan and marzipan cookies are a favourite holiday treat of mine. Had I known how easy Marzipan was to make I'd have started doing this years ago.


Sugar Free Marzipan


2.5 cups Almond Meal
1 cup Swerve or erythritol
2 egg whites
1/2 tspn Pure Almond Extract
1 tspn Rosewater (optional)

Method


  • Using an electronic food processor or mixer add the almond meal and Swerve

  • Alternative sweeteners like Splenda or Stevia can be used but Swerve is the best for taste and carb value in confectionery. 
  • Swerve does have carbs but as a sugar alcohol it does not affect blood sugar and can be discounted from the net carb values. 
  • Pulse the dry ingredients until a fine powder is formed

  • Separate your eggs and put the yolks asside - these will not be used in the recipe and should be used in another dish

  • Add the egg whites, Almond extract and Rosewater if using then pulse until a crumbly dough is formed
  • Knead on a clean non stick surface - if required dust with a small amount of almond meal to prevent sticking. 

  • Once properly kneaded a slightly sticky but smooth dough should be formed
  • You can use marzipan in cookies, cakes and pastries but they also make beautiful cake decorations or sweets on their own


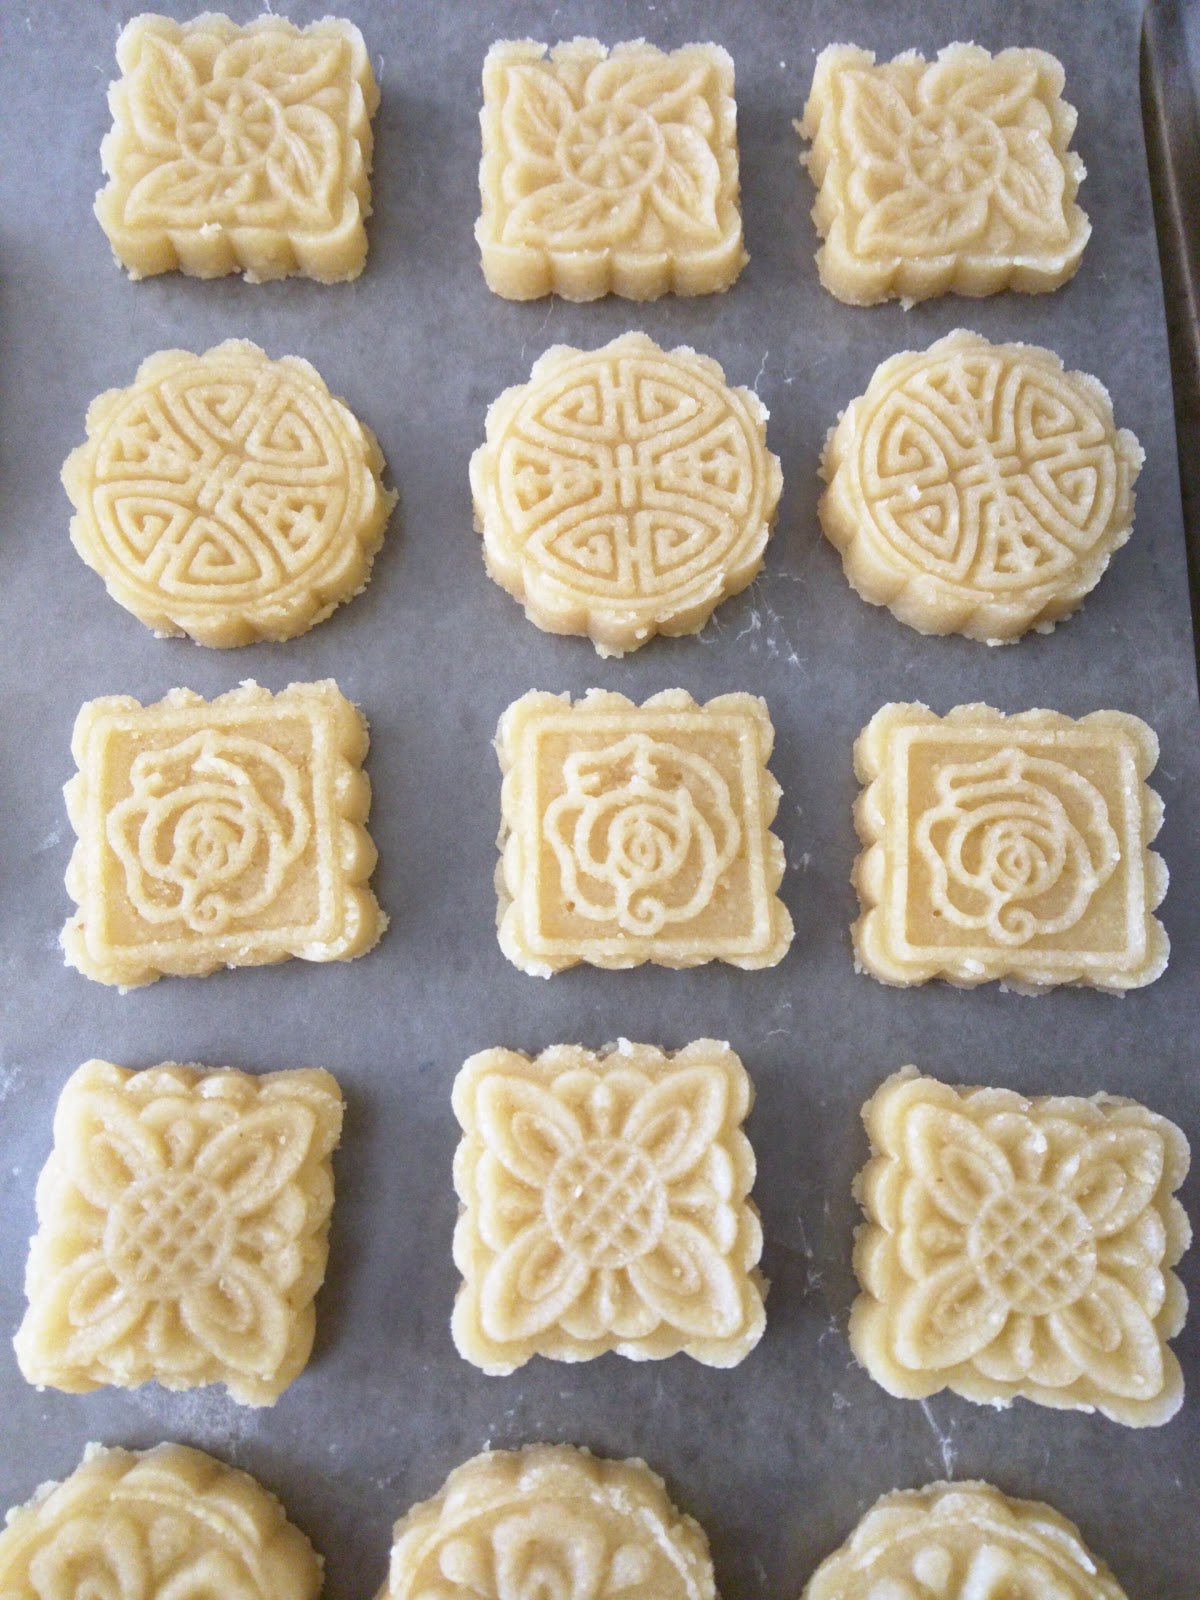
  • Here I'll show you how I prepared these giftable marzipans using a Mooncake mold but any cookie cutter or pastry plunger cutter works perfectly
  • Traditional mooncake molds look like large wooden paddles that you press cakes and pastries into to form presentation shapes for Mid Autumn Festival in Chinese communities, they can be fiddly to get cakes out of. 
  • Modern day plunger molds are perfect for forming marzipan and other thick pastries and cost less than $20 for a set. They can be bought online direct from China or via domestic US online stores like Amazon

  • Roll out your marzipan to the desired thickness, remember this is a heavy sweet due to the nut content so 1cm (~1/2 inch) is more than enough
  • Press the outside of the mold flat to your board and then plunge the decorative pattern into the marzipan, hold for around 2 seconds and then lift the plunger and remove the marzipan
  • You may need to push the plunger back down and carefully peel the marzipan off the design, particularly for intricate patterns
  • Place in an air tight container and refrigerate until consumption
  • If desired dip into 100% cocoa chocolate which has been tempered, but these are delicious on their own
  • Makes around 18 1 inch square confections - each serving is 96 calories, 8.3g fat and 1.1g net carb

Monday, June 29, 2015

Recipe: Lamb Kofta (egg & gluten free)

This is a healthy and fragrant dish, just delicious for grilling in the summer and serving with salad or on slider buns with hummus.

Lamb Kofta


4 cloves garlic
1 tbpsn grated or crushed ginger (or 1 tspn ground dried ginger)
1 tbspn ground coriander seed
1 tspn cumin
1/2 teaspoon cinnamon
1/2 teaspoon all spice
4 pods cardamom (or 1 tspn ground cardamom)
1 zucchini
1/2 onion
1 lb ground lamb
salt & pepper

Method


  • Before you begin prepare a large mixing bowl and a tray to place the formed kofta on
  • Grate or dice the zucchini finely and add to the bowl
  • Cut the onion into chunks and add to a food processor


  • Add all the spices to the processor - salt, pepper, cinnamon, cummin, coriander, cardamom, all spice, garlic and ginger
  • Puree the onion until the spices are well integrated - you may need to grind the cardamom pods before adding to the onion mix. 


  • Place the onion/spice puree and the ground meat into the bowl and mix with your hands until the spices and vegetables are well distributed throughout the meat
  • Pull a small ball of meat out of the mixture and roll with your hands, then play "patty cake" and toss the meat slightly between your hands. This ensures a firmer and consistent shape. 
  • For sliders form into burger patty shapes or for kofta kebab roll into a small cylinder and thread onto a kebab. 
  • Makes 8 small patties (155 cals, 3g fat, 2.5g net carb) or 12 kofta kebabs (103 cals, 2g fat, 1.5g net carb)


  • Grill on a hot barbecue or a cast iron skillet until browned ~7 mins
  • The vegetables lighten the dish and add 'stickiness' meaning you do not need egg or wheat making this a perfect gluten free or keto dish when served with salad
  • This is a great dish to prepare in large batches. Anything you are not eating immediately can be covered in plastic and moved to the freezer. Once frozen remove the kofta from the tray and store in an airtight plastic bag or container. 

Kofta Sliders